Thursday, February 4, 2010

Tips & Tricks #1: Getting the Most Out of Your Opaque Projector! 4 Simple Rules.

An opaque projector can be a wonderful tool to enhance your creativity and a life-saver when you need to make a difficult enlargement of an artwork in a hurry, but it's a temperamental beast that can also be quite frustrating to work with if you don't know the best way to approach it.

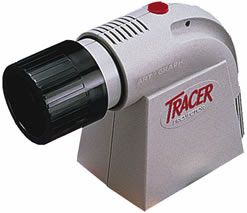
The basic concept is simple: You place a reference image on the glass plate, turn on the light and adjust the focus and distance from the surface you want to transfer the image to. So, it allows you to take a small image (a preparatory sketch for example) and project it at a much larger size onto a canvas or other surface. Then you can trace the projection onto the surface with a pencil and get a very accurate rendering of the original image, only bigger.

Sounds simple, right? Well, we don't mind saying that we've run into a few customers at BINDERS who were less than enthusiastic about the results and that's because they didn't know the rules that the projector lives by. Fortunately we were able to help them out and we'll do the same for you right now!

Rule #1: Use Line Art for Your Reference Image.

Opaque projectors don't handle color or value gradations well at all, so the best reference image is a high contrast, black-and-white image, such as a drawing done with black ink or a dark pencil — any sketch or preparatory drawing that uses contour lines will work just fine. Ink would be preferable here, since the graphite would smudge on the glass plate and require you to clean it before each session.

The most common complaint about these projectors is that photographs look terrible in the projection, which is a true and unalterable fact. SO, if you want to enlarge and transfer a photograph onto your canvas, we recommend using a piece of tracing paper to create a preparatory drawing that includes only the main contour lines of the photo image, ignoring light and dark values and color completely. Then place the traced image on the projector and copy the lines onto your canvas. Once you have the contours transferred, you can work the values and colors directly on the canvas, using the original photo as a reference, but you will have solved the problem of placement and scale of everything in your painting before you begin!

Rule #2: Work in a DARK Room!

In order to show crisp lines that are easy to trace, you'll need to work in the darkest possible room you can find. Make sure that the projector is the only light source in the room and you will save yourself many headaches! Plus, it's always fun figuring out how to hold your pencil to the surface and keep from blocking the light at the same time!

Rule #3: Make Sure Your Reference Image Is Small Enough.
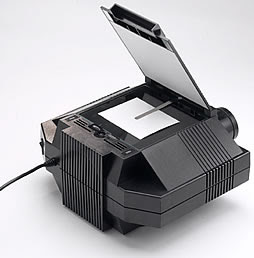
The projector will give you a sharp, clean image of whatever is on the center of the glass plate, but it gets progressively fuzzier towards the edges of the plate. Use an image that is smaller than the glass plate and you will get the clearest projection. For example, our Artograph Prism Projector has a 7x7 inch glass plate, so we make sure that the reference image that goes into it is never greater than 5 inches in height and/or width. With the drawing never being closer than an inch from the edge of the plate, we always get a clean, sharp projection.

You say your reference image is too big? We solve that problem by scanning the images onto our computer and then resizing them to 5 inches or less. Print the image out at the new size and you're ready to go! Any image editing software, like the one you use for your digital camera, should have resizing capabilities.

Rule #4: Be Gentle When You're Tracing!

Once your projection is happening and you're ready to start transferring the image onto your surface, make sure you draw lightly with the pencil to avoid moving the surface in any way. You can also invest in a sturdy easel or some other kind of support. If the surface you are tracing the image onto moves around at all, the image will become distorted and you will find that your lines no longer meet up. This is a particularly big problem with stretched canvas, which is flexible enough that it moves very easily. So, place your surface on a solid easel or hang it directly on a wall and draw lightly over the projection.
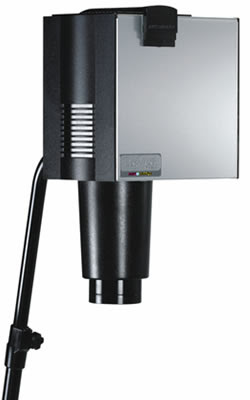
We hope that, for those of you who already own an opaque projector, this set of rules will help you to get the most out of your equipment. The projector is a powerful tool that can streamline your workflow tremendously - we know we're never going back to the days of drawing a grid and copying the reference image square by square! As long as you work with it in the way it works best, your opaque projector will give you great results every time.

If you don't own a projector, but this article has made you think you might like to have one, we encourage you to stop by BINDERS and have one of our expert sales associates show you our selection. We have a range of models, from the economical Tracer Junior — which is great for young artists — to our professional-quality selection by Artograph.

Next week: An Interview with Anne Elser on Calligraphy, Bookmaking and Life!

Sunday, January 31, 2010

This Week @ BINDERS - February 1-7

SALES • ART CLASSES & WORKSHOPS • ART HAPPENINGS

Among the many inspiring art quotes we’re heard one of our favorites is by Pablo Picasso. "Every child is an artist. The problem is how to remain an artist once we grow up," he said. Or, as we at BINDERS like to paraphrase that sage insight: “Remaining true to your inner artist is a great way to stay young, no matter what your age.” In short, BINDERS is here to help keep the artist within you alive and well!

Monday, February 1:
Guided Open Studio with Kay Powell
10:30am-2pm • Every Monday
Fee: $15/session. No sign up needed. Please pay the instructor.

Calligraphy 2 with Anne Elser
6-8:30pm • Mondays, 6 sessions, Jan. 4-Feb.8 •
Fee: $140
Advanced level for those who have taken Anne’s Copperplate or Italic class

Guided Open Studio with Kay Powell
6:30-8:30pm • see details above.


Tuesday, February 2:

Painting - Design and Technique with Charles Y. Walls
1-4pm • 6 sessions, Jan. 5-Feb. 9 • Open to all levels. • Fee: $140

Painting - Design and Technique with Charles Y. Walls
6-8:30pm • see details above

Bookmaking with Anne Elser
6-8:30pm, Tuesdays, 6 sessions, Jan. 5-Feb. 9 • Fee: $140

Wednesday, February 3:
Copperplate Calligraphy with Anne Elser
6-8:30pm, Wednesdays, 6 sessions, Jan. 6-Feb. 10 • Fee: $140

Thursday, February 4:
No special art events today.

Friday, February 5:
No special art events today.

Saturday, February 6:
No special art events today.

Sunday, February 7:
No special art events today.

Please note: Classes on this schedule are in our Atlanta store unless otherwise indicated. For more information please email or call Eli Pelizza at 404.237.6331 ext. 203.


Check out the full list of our upcoming art classes and art workshops! Attend 5 classes, workshops or demos and receive 25% OFF of your next class.


EXHIBITS AT THE LIMELIGHT GALLERY

New exhibits coming soon!

Visit the BINDERS website at www.bindersart.com!

Wednesday, January 27, 2010

Anatomy of a Paintbrush - Part 2, Sizes, Materials & Mediums

SIZES
Artists’ paintbrushes are usually given numbered sizes that correspond to the width of the bristles just above the ferrule, although there is no exact standard for their physical dimensions.

The most common sizes for soft round brushes are #4/0 to 24 (1/64” to 11/16“ wide).

For bristle brushes, common sizes range from #0 to 24 (1/32” to 31/32” wide).

From smallest to largest, the sizes are:
  • 10/0 (say “ten-zero“), 7/0, 6/0, 5/0, 4/0, 000, 00, 0, 1, 2, 3, 4, 5, 6, 7, 8, 9, 10, 11, 12, 13, 14, 16, 18, 20, 22, 24, 25, 26, 28, 30.
  • Brushes as tiny as 30/0 are manufactured by major companies, but are uncommon.
If you need brushes larger than one-inch wide, you may have to resort to the kind used by furniture refinishers and house painters. Abstract expressionist Franz Kline swung a five-inch-wide brush from the hardware store.

Now that you are familiar with paintbrush sizes (above), as well as their various shapes (see Part 1), you should also be mindful of what materials the brushes are made of, and of course the painting medium you’ll be using.

MATERIALS
Should you choose hair or bristle brushes? Should they be natural or synthetic? Here is a summary of the most common materials used to make fine art paintbrushes:
  • High quality, soft hair paintbrushes are made from costly Kolinsky sable and Red sable. More moderately priced are ox hair (sabeline) brushes. Less expensive still are squirrel, pony, horse, goat, mongoose, sheep, rabbit and badger. “Camel hair” brushes are least expensive, although it does not come from camels.
  • Synthetic brushes have almost the same qualities as natural hair and bristle brushes but at a more affordable price.
  • Synthetic “hairs” and “bristles” are made of special multi-diameter extruded Nylon-type filament intended to mimic the taper of natural fibers. Whether they are white, orange, brown or another color, synthetic brushes are pretty much the same.
  • Bristle paintbrushes may be either natural or synthetic, depending on the degree of stiffness/softness you require.
  • Hog bristles (often called China bristle or Chunking bristle) are stiffer and stronger than soft hair. It may be bleached or unbleached.
  • Stiff brushes are generally stronger, and thus last longer, than soft brushes.
  • Cheap brushes have short life spans. Their hairs and bristles soon go limp or fall apart, leaving behind broken specks on your paintings.
MEDIUM
Artists’ paintbrushes are usually made for specific painting mediums, such as watercolors, oils and acrylics. Although there are not rules, here are some guidelines:
  • Watercolor brushes are usually made of natural sable, synthetic sable or Nylon. (Watercolorists favor natural hairs, due to their superior ability to absorb and hold water.)
  • Oil brushes can be either natural hair or bristle, as well as synthetics.
  • Acrylic brushes, which are almost always synthetic fibers. (Since acrylic is a water-based medium, synthetics are ideal because they aren’t susceptible to water damage.)
ABOUT HANDLES & FERRULES
The handles of artists' brushes are usually made of wood but can also be made of less expensive molded plastic. While many mass-produced handles are made of unfinished raw wood, better quality handles are of seasoned hardwood. The wood is sealed and lacquered to give the handle a high-gloss, waterproof finish that reduces soiling and swelling. They last longer too.

Ferrules keep it all together, firmly clinching the bristles/hairs, adhesives and handle into a reinforced, precision instrument. Metal ferrules may be of aluminum, nickel, copper or nickel-plated steel. Quill ferrules (natural or transparent plastic tightened in place by thin wire) give a different "feel" to the brush.

You’ll feel good exploring BINDERS Paint Brushes Department. It is literally bristling with full range of artists’ brushes in all shapes, sizes and prices ranges. From the world’s finest sources, choose from Princeton Brush, Winsor & Newton, Yasutomo, Silver Brush, Art Alternatives, Loew-Cornell, Grumbacher, Isabey, Escoda and many more.

You could say, we’ve got different strokes for different folks.

Tuesday, January 26, 2010

Call for Artwork! Popular - a Juried Art Exhibition inspired by Pop Culture


Are you an artist? Are you into all things pop culture? Well then we have something for you!

BINDERS is sponsoring this exhibition along with Rhythm Liqueur, kidrobot, Asahi Beer and City of Ink.
  • All artwork* must be submitted by February 22th
  • Submit to City of Ink: 323 Walker Street, Atlanta GA 30313
  • Call (404) 525-446 with any questions.
Opening Reception: February 26 from 7 to 10pm at City of Ink
Donate a can of Campbell's Soup for their window display to feed the homeless.

*Submitted artwork will be reviewed by a jury, judged on technical skill, creativity, and craftmanship. No restrictions on size or medium.

Please visit http://www.thecityofink.com/ for more info.

Anatomy of a Paintbrush - Part 1, Shapes

Paintbrushes are used for applying paint or ink. With a little help from Wikipedia, we’d like to briefly paint in some of the details.

Brushes are usually made by clamping the bristles (hairs) to a handle with a ferrule, a metal collar or ring. Short-handled brushes are mainly for watercolor, ink painting and calligraphy, while the long-handled brushes are intended for oil or acrylic paint.

The styles of brush tip seen most commonly are:
  • Round: Long closely arranged bristles for detail.
  • Flat: For spreading paint quickly and evenly over a surface. They will have longer hairs than their Bright counterpart.
  • Bright: Flat brushes with short stiff bristles, good for driving paint into the weave of a canvas in thinner paint applications, as well as thicker painting styles like impasto work.
  • Filbert: These are flat brushes with domed ends. They allow good coverage and the ability to perform some detail work.
  • Fan: For blending broad adjacent areas of paint.
  • Angle: Like the Filbert, these are versatile and can be applied in both general-painting. applications as well as some detail work.
  • Mop: A larger format brush with a rounded edge for broad soft paint application as well as for getting thinner glazes over existing drying layers of paint without damaging lower layers.
  • Rigger: Round brushes with longish hairs, traditionally used for painting the rigging in pictures of sailboats and ships. They are useful for fine lines and are versatile for both oils, acrylics and watercolors.
Some other styles of brush include:
  • Sumi-e: Known by its Japanese name, it is an East Asian type Ink and wash painting brush, similar to certain watercolor brushes. They generally have a thick wooden or bamboo handle and a broad soft hair brush that when wetted should form a fine tip.
  • Hake: An Asian style of brush with a large broad wooden handle and an extremely fine soft hair used in counterpoint to traditional Sumi-e brushes for covering large areas. Often made of goat hair.
  • Spotter: Round brushes with just a few short bristles. These brushes are commonly used for small detail work, such as covering spots on photographic prints.
Speaking of coverage, BINDERS Paint Brushes Department is like a store within a story -- literally bristling with full range of artists’ brushes in all shapes, sizes and prices ranges. From the world’s finest sources, choose from Princeton Brush, Winsor & Newton, Yasutomo, Silver Brush, Art Alternatives, Loew-Cornell, Grumbacher, Isabey, Escoda and many more.

And while you here, don’t forget brush cleaner.

Coming next: Part 2, Brush Sizes

Visit the BINDERS website at www.bindersart.com!

Sunday, January 24, 2010

This Week @ BINDERS - January 25-31

SALES • ART CLASSES & WORKSHOPS • ART HAPPENINGS

Just in case those pesky Internet gremlins failed to deliver our recent email to you, we’ll ditto this very important message: At BINDERS you don’t have to be a big
artist to save BIG money! We know that artists come in all sizes and colors. That is, every artist has her or his own unique specialty, medium and passion. And whether you’ve been an doing art for days or decades, BINDERS is your
place for sizeable savings on art materials. BINDERS is here to help you be all the artist you want to be.

Monday, January 25:
Guided Open Studio with Kay Powell
10:30am-2pm • Every Monday
Fee: $15/session. No sign up needed. Please pay the instructor.

Calligraphy 2 with Anne Elser
6-8:30pm • Mondays, 6 sessions, Jan. 4-Feb.8 •
Fee: $140
Advanced level for those who have taken Anne’s Copperplate or Italic class

Guided Open Studio with Kay Powell
6:30-8:30pm • see details above.


Tuesday, January 26:

Painting - Design and Technique with Charles Y. Walls
1-4pm • 6 sessions, Jan. 5-Feb. 9 • Open to all levels. • Fee: $140

Painting - Design and Technique with Charles Y. Walls
6-8:30pm • see details above

Bookmaking with Anne Elser
6-8:30pm, Tuesdays, 6 sessions, Jan. 5-Feb. 9 • Fee: $140

Wednesday, January 26:
Copperplate Calligraphy with Anne Elser
6-8:30pm, Wednesdays, 6 sessions, Jan. 6-Feb. 10 • Fee: $140

Thursday, January 28:
No special art events today.

Friday, January 29:
No special art events today.

Saturday, January 30:
No special art events today.

Sunday, January 31:
No special art events today.

Please note: Classes on this schedule are in our Atlanta store unless otherwise indicated. For more information please email or call Eli Pelizza at 404.237.6331 ext. 203.


Check out the full list of our upcoming art classes and art workshops! Attend 5 classes, workshops or demos and receive 25% OFF of your next class.


EXHIBITS AT THE LIMELIGHT GALLERY

New exhibits coming soon!

Visit the BINDERS website at www.bindersart.com!

Wednesday, January 20, 2010

The Remarkable Sand Artist from Ukraine

Kseniya Simonove, 24, is a “sand artist” with an amazing and mesmerizing talent. As the 2009 winner of the TV show “Ukraine’s Got Talent,” she was awarded a prize of 1,000,000 Ukrainian hryvnia (approximately US $125,000).

The video shows Kseniya drawing a series of “sand” pictures on a giant illuminated table, along with dramatic music and sound effects, to imaginatively interpret Germany's invasion and occupation of Ukraine during WWII. Projected onto a large screen behind her, the images she draws and animates moved many in the audience to tears.

Kseniya says she started drawing with sand at the beach after her business collapsed due to the early 21st century credit crunch. Less than a year later, her life changed when she blew audiences away with her unprecedented sand animation performance, watched by over 13 million people.

The exposure she’s received after winning the “Ukraine’s Got Talent” prize has helped the young artist, born in 1985, build a new career out of her art.

Please take time out to see this fascinating piece of art.

Visit the BINDERS website at www.bindersart.com!